Showing posts sorted by relevance for query 5. Sort by date Show all posts

Fondant Cake Decorations - 7 Tips For That Perfect Wedding Cake By Donald Saunders

Whether you make it yourself or buy it from your local supermarket, rolled fondant icing is the icing of choice choice for wedding cakes and for other "special occasion" cakes. Drying to a smooth matt porcelain finish, it is suitable for cakes of all shapes and provides the ideal base for the most inticate or simplest of decoration.

Fondant icing is a soft sugar-based icing that is generally rolled out to a thickness of about 1/4 inch, layed over the cake and smoothed and pressed into place before being trimmed for a perfect fit.

Despite the fact that fondant cake decorations are ideal for a wedding cake, fondant icing is not always easy to work with so here are a few tips to help you get that perfect result.

Tip 1. Fondant icing should be stored in a plastic bag (or covered in a non-permeable plastic wrap such as Sara wrap) and placed in a tightly sealed container to prevent it from drying out. Fondant icing should also be kept at room temperature and should not be put in the refrigerator. If the icing dries out and harden it can often be revived by popping it into a microwave oven for a few seconds and then kneading it back to life.

Tip 2. Fondant icing dries out very fast and should be applied to the cake quickly (within no more than 5 minutes) after it has been rolled out. Once fondant icing is applied, the cake can be stored without problem for several days at room temperature.

Tip 3. In the case of cakes with a number of tiers, each tier should be iced individually before assembling the cake. It is also advisable, when the final design allows, to store the tiers separately and to assemble them when the cake is needed.

Tip 4. For that truly professional looking finish, and to cover any rough edges, make a decorative border to go around the cake and, particularly, to cover the join between adjoining tiers.

Tip 5. Fondant icing should always be used at room temperature.

Tip 6. For a smooth and flawless result, ensure the working surface, rolling pin and hands are both clean and lint free. jewelry on your fingers or wrists, long hair, long fingernails and fluffy clothing could all cause problems.

Tip 7. A "crumb coat" (a thin layer of icing) should be applied to the cake before the fondant is added. This produces a tacky surface for the fondant icing to stick to.

When contemplating the quantity of fondant icing involved try to allow for having too much icing rather than too little, as leftover icing can be stored and used at a later date.

As a guide, for 3 1/2 inch high cake layers a 12 inch diameter round cake will need about 3 pounds of icing, while a 8 inch diameter square cake will need about 2 1/2 pounds of icing.

For some people fondant cake decorations, in spite of their marvellous appearance, are somewhat bland and this can be solved by adding flavoring, often accompanied with coloring. There are many flavorings available and typically to flavor one pound of icing you can add 1/2 cup of dried, shredded and sweetened coconut, 3 to 5 drops of oil of peppermint or 1/3 cup of hazelnut or peanut butter.

Visit us at TalkingWeddings.com for all of your wedding needs including fondant cake decorations.
Read more »

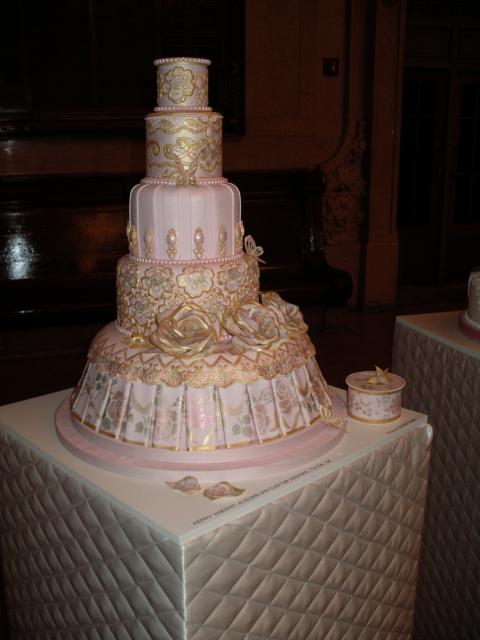
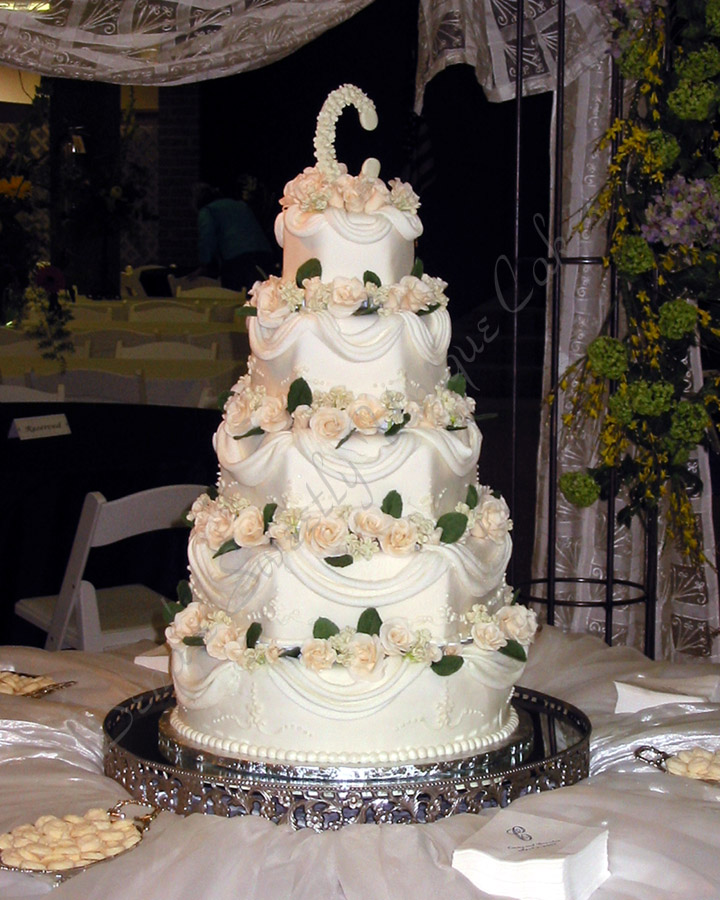
5 Tier Wedding Cake

5 Tier Wedding Cake wcThis beautiful 5 tier wedding cake was designed by Dena's Cakes.
Read more »

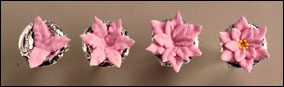
Poinsettia

Poinsettia

Getting Ready:

Position foil 1/2 way in 1-5/8 in. lily nail
Prepare two parchment bags, one with tip 352, one with tip 2
Fill bags half full with stiff consistency royal icing; pink for petals (tip 352), yellow for center (tip 2)
Icing: Stiff consistency royal
Nail: 1-5/8 in. lily nail
Tips: 352, 2
Positions:
- Bag: 45° angle at 3:00 (9:00) for petals, 90° angle for center
- Nail: in left (right) hand
- Tips:
For petals: pointed end touching nail
For center: slightly above flower

1. Insert tip into lily nail. Squeeze hard and pipe leaf shaped petal just over edge of foil cup; relax pressure, stop and pull away.
2. Pipe two more petals, dividing the nail into thirds. Add three more petals in the open spaces.
3. Add six smaller leaf shaped petals on top and between the larger ones.
Add seven tip 2 dots to center.

Found at Wilton.com

Read more »

Daisy

Daisy

Practice with Tips: 104, 5
Icing Consistency: Medium Royal Icing
Bag Position: For Petals, 45° at 3:00 (9:00); For center, 90°. Hold Tip: For petals, wide end lightly touching 1/4 inch away from center of nail, narrow end pointing out to outer edge; for center, hold slightly above flower.

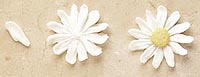
1. Dot center of flower nail with icing as guide for flower center. Starting at any point near outer edge of nail, squeeze and move tip towards center icing dot. Stop pressure, pull tip away.

2. Repeat for a total of 12 or more petals.

3. Add tip 5 flower center and press to flatten. For pollen effect, dampen your finger, dip in crushed Cake Sparkles?, then press on center.

Try these combinations on your daisies?yellow petals with yellow or blue centers, violet or blue petals with yellow centers, peach petals with orange centers. Highlight the center with Cake Sparkles? or colored sugars which are extra fine texture.

Found at Wilton.com

Read more »

Fun Flowers

fun flowers
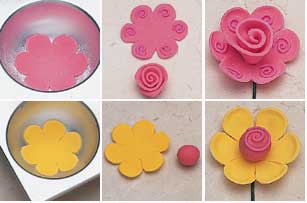
Make one full-bloom yellow blossom, two solid rose blossoms and one yellow/rose blossom as follows:

Roll out tinted gum paste and cut blossoms using second smallest (2 1/2 in.) blossom cookie cutter. For full-bloom yellow blossom, this will be bottom row of petals; cut top row using smallest (1 1/2 in.) blossom cookie cutter. Using craft knife, cut between all petal divisions to 3/4 in. deep.

Place flowers on foam and use ball tool from confectionery tool set to thin and fan out petals. Let dry in cornstarch-dusted Mini Ball Pan.

For full-bloom yellow blossom, attach top and bottom rows of petals with brush dipped in water. For centers of solid rose and full-bloom blossoms, cut a 5/8 in. wide x 5 in. long strip of tinted gum paste. Roll up strip in four complete turns, pinching at bottom and trimming excess with each turn. For center of Flower #3, roll a 3/4 in. of rose-tinted gum paste. Attach centers to flowers with gum paste.

Using royal icing, pipe tip 2 swirls on solid rose petals and center of yellow/rose blossom.

Using gum paste, attach centers to flowers and flowers to wire wrapped in florist tape.

Used in Dazzling Dimensions

Found at Wilton.com

Read more »

Cake Decorating Ideas For All Occasions By Michael Leembruggen

You really don’t need a special occasion to decorate a cake, but some events that can be made unforgettable and extra special with a decorated treat are holidays, birthdays, graduations, religious occasions, showers, weddings, and other personal special events.

Here are some cake decorating ideas that will help you make any occasion special:

New Year’s Champagne Toast

Bake one 9-in. round and one 9x12-in. rectangle cake.

Cut the round in half. Use one half for the top of the champagne glass.

Cut a 2 or 3-inch long strip for the stem of the glass and a 2 x 4-inch section for the base of the glass. Piece them together to form the champagne glass. To be sure all the pieces stay together, lightly frost each piece separately before you piece them together.

Place the pieces on a cake board. Ice the top part (straight edge) of the half-round cake and the stem and base sections in white icing. Ice the bottom part (rounded edge) of the half-round cake in light yellow or light pink icing to resemble champagne.

Easter Egg Hunt (So easy kids can do it!)

Bake 6 large muffins. Cool and frost them with green icing. Generously sprinkle green shredded coconut* on top of the frosting to resemble grass. Place colored jelly beans within the coconut so they are half-hidden. Place small bunny toppers on the top of the muffins so they look as if they are finding the jelly beans.

*To tint shredded coconut, place coconut in a plastic bag. Add a few drops of food color. Knead color into coconut. Dry on waxed paper.

Spooky Halloween Brownies (Let the kids help!)

Bake your favorite brownies. When cooled, cut into 3-inch circles, using a cookie cutter or a pattern and sharp knife. Place a Halloween stencil (available in most stores) in the center of each brownie. Sprinkle the stencil with confectioner’s (powdered) sugar. Remove the stencil. Edge the top and the bottom of brownie with tip 14 white icing stars.

Shiny Christmas Ornament

Bake a one or two-layer round cake. Ice the cake smooth with white icing. Pipe tip 5 white icing lines across the top at 1-inch intervals. Vary the shapes of the lines, making one straight, one zigzag, one curvy, etc. to resemble decorations on an ornament. Randomly pipe tip 5 icing balls and tip 16 stars between the lines also to resemble decorations.

ADULT BIRTHDAY / SPECIAL OCCASION

Let Me Call You Sweetheart

Bake a heart-shaped cake and a heart-shaped mini-cake. Ice the larger cake smooth with pink icing. Place the mini-cake in the center of the larger cake. Cover the mini cake in tip 16 red icing stars. Add a tip 14 red icing shell border at the bottom of the mini cake and a tip 16 red icing shell border at the top and the bottom of the large cake. Write your message in pink with tip 3 on the mini-cake.

KIDS BIRTHDAY

Rainbow Train

Bake four mini-loaf cakes. (about 3-1/2 x 4-1/2 inches each.)

Ice each one smooth – one with red icing, one with blue icing, one with green icing, and one with yellow icing. Use the cake iced in red as the engine: Make a smokestack for the engine with 2 large marshmallows. Frost them together with green icing. Attach the marshmallows to the top of engine with a toothpick. Using green icing, attach a piece of white curly ribbon or candy on the top of the smokestack for smoke and attach two white or yellow gum drops to the front of the engine for headlights. With a spatula, place a small mound of yellow icing on top of the yellow car; add small chocolate chips to resemble coal. Place two or three small plastic cars on top of the blue car. Stick small stick candies, such as licorice pieces on top of the green car to resemble metal parts. Decorate the sides of the cars with various small hard candies for decorations. For wheels: With icing the same color as the car, attach 4 large candy discs, such as peppermint swirls, to the bottom of each car. Connect the cars with one-inch licorice whips or pretzel sticks.

Up! Up! And Away

Bake two each: tulip, flower, butterfly and dragonfly cookies (eight total) and a 9x12-in. rectangle cake. Ice the cookies smooth in various pastel colors with thinned royal icing.** Decorate the iced butterfly cookie with tip 3 colored icing dots.

Ice the bottom half of the 9x12-in. cake smooth with green icing and the top half smooth with light blue icing to resemble grass and the sky. Place two small mounds of white icing on the blue half for clouds. Pat down “the clouds” with your fingers dipped in cornstarch. Place the tulip and flower cookies in the “grass” and pipe tip 3 green stems and leaves, if necessary. Place the one butterfly cookie near the flower cookie and the other butterfly cookie and the dragonfly cookies in the “sky.” Write your message on the cake with tip 3 white icing.

**Royal Icing Recipe

2 cups sifted confectioner’s sugar

2 scant tablespoons meringue powder

3 tablespoons water

Beat all the ingredients a low speed until the icing forms peaks.

(Makes about 1-1/2 cups)

You can find more great cake decorating information at CakeDecorating-Secrets.com.
Read more »

Unique Cake Decorating With Flowers By Paula Wilkinson

Flowers as a Cake Decoration, unique and easy to place on every one of your cake creations.

Flowers, both real and artificial are relatively simple to use. Read through this article to get some great tips and ideas on using real and/or artificial flowers on your cakes.

Section 1: Artificial Flowers
Section 2: Real Flowers
Section 3: Sugar Glazing Flowers

1. Artificial Flowers

Step 1: Cut the stems from the flowers, approximately 1 ½ inches from the base of the flowers and leaves.

Step 2: Cut a piece of floral wire at least 4 inch. (If you buy the pre-cut ones, typically they are 6 inches which is fine.)

Step 3: Use floral tape to secure the flower to the new stem.

Step 4: After you have done this to all of the flowers and leaves, place them all together and use floral tape to secure them in any order you would like. (Tip: Do not place floral tape all the way down the stems. Only place enough to secure the flowers, making sure that the individual wires do not come out of the tape.

Step 5: Bend the stems carefully using the flower head between your thumb and index finger. Once you have each flower where you want it, cut the excess stems off of the flowers holding onto the floral tape and not the flowers.

2. Real Flowers

Real flowers can be place directly on the cake you have prepared or you can follow the instructions above to add movable stems to them.

Tips for purchasing real flowers:

Tip 1: Make sure you are using an edible flower unless your cake is for show.

Here is a website that has a complete list of edible flowers: http://homecooking.about.com/library/weekly/blflowers.htm.

Tip 2: Make sure that the flowers do not have pesticides on them. You can do this by picking them out of your own yard or just ask the florist that you are purchasing them from. Typically florists have sets of flowers that have never been treated for pesticides.

Tip 3: Make sure you freeze your flowers and apply them to the cake directly before serving or showing it. If you are adding stems, add them as soon as you get the flowers, place them in baggies or an airtight container and freeze them until you are ready to put them on the cake.

3. Sugar Glazing Flowers

Step 1: Fill one bowl with a gently beaten egg white and put some regular sugar in a second bowl.

Step 2: Cut the stems on the flowers or fruits leaving only enough to hold onto with your thumb and forefinger. (Tip: Make sure you are using an edible flower for this.)

Step 3: Coat the fruits or flowers you are sugaring using a pastry brush lightly with the egg white. Make sure you get all parts of the flower or fruit.

Step 4: Using a spoon, sprinkle sugar all over the flowers or fruits. Make sure you cover all parts of the flowers or fruits.

Step 5: Place on a paper towel to dry. This typically, takes a few hours. After they are dry add them to your cake.

You can be as creative as you like with flowers on cakes, they make for a beautiful and unique decoration!

Paula Wilkinson is the author of Cake Decorating Secrets. Cake Decorating Secrets presents and answers numerous problems and issues in everyday cake decorating, as well as provides unique advice and tips. You can visit her website at CakeDecorating101.com.
Read more »

Fondant 101

Fondant 101


The porcelain-smooth finish of rolled fondant creates a suitable base for a variety of decorations and embellishments and can keep a cake fresh for several days (even in warm weather) by protecting it from air exposure. Rolled fondant is a popular choice for wedding cakes, but it does not have to be reserved for nuptials alone; its rich, sweet taste makes it a good icing for cakes for any special occasion.

Amount Guidelines
When deciding how much fondant to portion out, err on the side of too much. Excess fondant can always be reused.

For round, octagonal, petal, or hexagonal tiers approximately 3 1/2 inches high:
6-inch diameter: 1 1/2 pounds fondant
8-inch diameter: 2 pounds fondant
10-inch diameter: 2 1/2 pounds fondant
12-inch diameter: 3 pounds fondant

For square tiers approximately 3 1/2 inches high:
6-inch diameter: 2 pounds fondant
8-inch diameter: 2 1/2 pounds fondant
10-inch diameter: 3 pounds fondant
12-inch diameter: 4 pounds fondant

Fondant Tips
1. Fondant should be used at room temperature.

2. For a flawless final appearance, be sure that your surface, rolling pin, and hands are clean and lint-free. Tie back long hair, trim long nails, avoid wearing fuzzy clothing, and remove any jewelry on your hands and wrists.

3. When storing fondant, make sure the plastic bag and tub is tightly sealed to prevent it from drying out. Store the tub at cool room temperature; do not refrigerate. It will last for several days.

4. For best results, spread a thin layer of icing over the cake before applying the fondant; this "crumb coat" will create a tacky surface to which the fondant can stick.

5. Once the fondant has been rolled, quickly transfer it to the cake; the time between rolling it out and covering the cake should be no more than 5 minutes. The iced cake will keep at room temperature for several days. If the cake’s filling requires refrigeration, avoid a long chilling time or the fondant can become dewy.

6. If you are making a multi-tiered cake, cover each tier with fondant before stacking them on top of one another. For best results, stack just before serving.

7. To conceal rough edges between the fondant-covered cake layers, and for a more professional appearance, create a decorative border around the cake’s edges and between the tiers. Roll a small piece of fondant into a thin snake as long as the cake’s circumference. Wrap the snake around the cake’s edge, gently press into cake, and crimp as desired.

Found at MarthaStewart.com

Read more »

Morning Glory

Morning Glory

Practice with Tips: #104, 103, 2, 1


- Icing Consistency: Stiff Royal Icing
- Bag Position: For Ruffled Cup, 45° at 3:00 (9:00); For Stamen, 90°
- Hold Tip: For Inner Flower Cup, Wide and Narrow Ends Touching Surface; For Petals, Wide End Touching Top of Nail


Line 1 5/8 inch lily nail with foil. Position wide end of tip down in nail. Using tip 104 and white icing, pipe a shallow cup within the nail. Pipe a second cup slightly above the first. Smooth with a damp brush.
Using tinted icing and tip 103, pipe a ruffled cup slightly above the white inner cup, increasing pressure in five places to form points.


* When you are smoothing together the edges of your inner cup and ruffled cup, don't use too much water. Touch the brush to your hand before applying to remove excess water.


With dampened decorator brush, blend tinted icing into white center. Next, brush white icing up to form a star shape.
Using tip 1 and thinned white icing, pipe five lines from base of flower to edge. Pipe tip 2 center stamen using yellow icing

Found at Sugarcraft.com

Read more »

Fondant rose

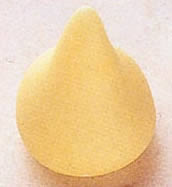
1. Using a 3/4-inch diameter ball of fondant, mold a cone base approximately 1-1/2-inch high.

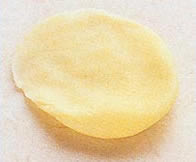
2. Roll a 3/8-inch diameter ball of fondant.

3. Flatten this ball into a circular petal about 1/4 inch thick on bottom and thin on the top. Make about the diameter of a nickel. Make several petals this size.

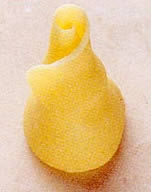
4. Wrap first petal around the point of the cone to form a bud.

5. Press three more petals around the base of the bud. Gently curl edges of petals.

6. Make five more petals using slightly larger balls of fondant. Flatten, then thin edge with finger and shape petals. Press petals under first row of petals. Continue, placing petals in between and slightly lower than previous row.


Found at Wilton.com

Read more »
Powered by Blogger.